Knowing how something works determines how well you will eventually use it. Knowing how well you will use that thing determines how much you will enjoy it.
In today article, we’re going to teach you All You Need To Know About AV Receivers
Most individuals see and have AV receivers as part of their home entertainment system, but do not know what they are and how they work, probably because it was set up for them by a technician.
Trust me; if you fall into this category, then it is possible that you may not be enjoying that tool.
In this article, I will enlighten you on everything you need to know about AV receivers ranging from what they are, what they do, how to set them up and so many more.
Basically, by the time you read the last sentence of this article, you would have gained enough knowledge to give a lecture on AV receivers. So stick with me as I take you on a journey of technological mental enrichment.
Table of Contents
- 1 All You Need To Know About AV Receivers
- 2 What Are AV Receivers?
- 3 What Does An AV Receiver Do?
- 3.1 1. Your Video source Is Connected And Switched By It
- 3.2 2. Your Audio Source Is Connected And Switched By It
- 3.3 3. Surround sound Formats Are Decoded By It
- 3.4 4. It Can Be Used As A Radio Tuner
- 3.5 5. AV Receivers Boost Audio Signals To Power Several Speakers
- 3.6 6. Your Home Theater’s User Interface is Provided By The AV Receiver
- 4 How To Choose AV Receiver
- 4.1 1. First Identify Your Room Or Apartment Size
- 4.2 2. The Number Of Channels You Need
- 4.3 3. The Amount Of Power You Need
- 4.4 4. Room Calibration Feature And Sound Quality
- 4.5 5. 4K And HDMI Inputs
- 4.6 6. Dolby Atmos And DTS:X
- 4.7 7. Wireless Connectivity
- 4.8 8. Multi-zone Speaker Function
- 4.9 9. How Much Does An AVR Cost
- 5 What Is The Best AV Receiver Brand?
- 6 3. The Yamaha RX-V685
- 7 How To Setup AV Receiver
- 8 How To Connect AV Receiver To TV
All You Need To Know About AV Receivers
What Are AV Receivers?
First off, before I tell you what AV receiver means I would love to educate you on what “AV” stands for. The A in AV stands for “audio”, while the V stands for “video”.
An AV receiver is a unified audio amplifier and video/audio redirection appliance for a home theater system.
An AV receiver comes with input ports for the owner’s video and audio sources like; CD or Blu-Ray Player, a digital media hub, and a cable box.
The amplifier’s outputs for audio are linked to woofers and speakers via stranded conductors. While the amplifier’s outputs for video are linked to the TV through HDMI.
Movie soundtracks such as Atmos, DTS, and Dolby Digital are supported by AV receivers. This audio enhancement tool has inbuilt audio effects put in place to augment films and songs.
What Does An AV Receiver Do?
Since you know what AV receivers are by now, the next question on your mind right now would be what are AV receivers used for?
Well… the epicenter of a home theater system is the AV receiver because your home theater’s performance is driven and controlled by it.
There are several things an AV receiver does for your home theater system.
1. Your Video source Is Connected And Switched By It
The home appliance that originates your video is directly connected to the AV receiver, which is then linked to your display appliance.
This enhances the simplification of your video sources selection when you intend to play a PVR recorded show, play a DVD, or any other thing.
In several scenarios, you chose what you desire to watch on the AVR remote without the need to adjust anything on the display.
2. Your Audio Source Is Connected And Switched By It
All home theater video sources are meant to be directly connected to your receiver. You are allowed to select or select the audio choice you wish to listen to via the receiver’s preamplifier section.
3. Surround sound Formats Are Decoded By It
An Av receiver has the distinct feature of decoding digital and analog sound formats. This particular feature cannot be found on a typical stereo receiver.
4. It Can Be Used As A Radio Tuner
Various AV receivers come with receivers for XM or Sirius satellite radio. If you are a bit old-fashioned, and maybe love to listen to the radio once in a while, then it will be a great idea for you to get the satellite function fixed into your receiver.
Although you should know that having this function does attract extra subscription charges.
If you cannot afford the extra subscription charge, but still want the “digital radio” feature, you may go after a receiver that can pick the free and new HD radio format.
5. AV Receivers Boost Audio Signals To Power Several Speakers
Yet another unique feature of an AV receiver is it has no less than five amplification channels to give more power to your surround sound system. Talk about a maximized audio experience.
6. Your Home Theater’s User Interface is Provided By The AV Receiver
Earlier in this article, I stated that the AV receiver is the epicenter of your home theater system.
Well, that spells very true here as the AVR basically makes the whole thing work as it has all the controls that would make the entire system work.
The interface includes; the remote of the receiver, the receiver’s face displays, and in several scenarios a display on your television.
All of these components ensure you are in charge of your home theater’s electronic elements.
How To Choose AV Receiver
At this point, I am pretty sure all that knowledge on what an AV receiver does has your blood pumping, you want to get yours right?
Good, now the burning question is how you do choose the right AV Receiver? Well, in this section I will give you a few hints.
1. First Identify Your Room Or Apartment Size
This is a very vital point, and its positioning in this list of hints is not accidental, as it should be the foremost thing to consider.
Knowing how big or small your space is will give you a semblance of a mental picture of what you would eventually get as it will help you properly decide the amount of AV receiver power that will be needed, how many channels are required, and the most deciding factor; how much cash you have to part with to acquire them. The bigger the room, the more the power required and vice versa.
2. The Number Of Channels You Need
Now before I go on with this point, let me iterate the point that the amount of features on your eventual receiver ascertains how much you will eventually spend because the more the features the pricier the receiver.
Therefore, in order to avoid spending too much, instead of focusing on features, you should lay emphasis more on the channels.
What are the channels you ask? A channel is basically the speaker capacity your receiver can power.
If your eventual AVR is equipped with five channels, that essentially means it can power five speakers, if it has seven channels then it can power seven speakers, and so on.
So when you eventually set out to get your AV receiver, have the number of speakers you need it for at the back of your mind.
3. The Amount Of Power You Need
Another important determiner of your eventual AVR choice is the amount of power it will actually require to handle your home theater system.
The amount of speakers your home theater system has does not decide the power your AVR is required to have to be able to power them. This is so because some speakers need more power than others.
For example, you may have two speakers that require more power to function than a set of speakers would need.
The amount of power an AVR has determines how much it will cost i.e. the more the power, the pricier it will be.
Receivers produce electronic power which is measured in watts. These watts are essential in making your speakers work.
So basically the black and white of this point is that you need to ask yourself; how much power do I need?
4. Room Calibration Feature And Sound Quality
There is a general notion that the more expensive an AVR is, the better the sound quality would be. Although this may not be a watertight fact, it does spell true in most cases.
Cheaper AVRs are most likely produced with mild equipment and components, while the more expensive ones are mostly produced with high-end equipment and components.
This high-end equipment and components usually equip the AV receiver with better sound quality.
A distinct trait you will constantly find even on affordable AVRs is room calibration. This feature utilizes an external mic to ascertain your room reflections and then customize your receiver’s sound to fit into the room.
That is amazing, right? Especially if your room has an odd and awkward shape.
If you have enough cash to go for an AVR that has the calibration feature, then you should get it by all means.
5. 4K And HDMI Inputs
HDMI is utilized to connect your sources like a Blu-ray player or console to your AVR.
Every AVR has several HDMI inputs and outputs behind and in front of it, it is an omnipresent feature in the world of home theaters, so it is one thing you should look out for.
Although, like everything else you need to consider before choosing an AVR, the more they are, the more expensive they would be.
With that in mind you should avoid getting an AVR with more HDMI inputs than you need, it’s wise and it saves you a lot. Besides, there are barely AVRs with less than four HDMI ports.
In the case that you view 4k stuff on your television, you will need to purchase an AVR with HDMI 2.0a or HDCP 2.2 certification.
This would ensure that the correct visual data gets to your television from your AVR, which means that you experience the best picture quality.
6. Dolby Atmos And DTS:X
Surround sound depends on something named codec, it doesn’t occur by happenstance.
Codec is a software program your AVR utilizes to ascertain the location of the sound. There are several codecs available for surround sound.
For the sake of this article, I would only discuss two with you. The Dolby Atmos and DTS:X. They both have little differences which we will talk about.
Atmos is a great choice for you if your setup is large I.e. if your speakers are tall standing speakers or towers.
The Dolby Atmos has the capacity to handle bigger and more powerful speakers, but the sound is better when the speakers are in a large space.
You know the live experience sound you enjoy at the movies? Yeah, that is a Dolby Atmos at work.
DTS:X is a great choice if you have a smaller setup. I.e. If you use smaller 5.1 or 7.1 speakers. The DTS produces amazing surround sound and spreads wider than the Dolby Atmos.
The distinct difference between the DTS:X and the Dolby is that the DTS can function with or without tall standing speakers, but the Dolby Atmos needs them to work.
7. Wireless Connectivity
We are currently in the most technologically advanced era in human history and these days it is rare to find an AVR without wireless connectivity features such as; Bluetooth and Wi-Fi.
These connectivity options have several beneficial uses like; playing music and sending content from an external device to your AVR.
If you stream via services like Spotify and Apple music, then your AVR and surrounding speakers can be converted to an online music system, just like that. Technology is great right?
New AVR models come equipped with Wi-Fi and Bluetooth connectivity. Very few models do not have.
When you eventually go shopping for your AVR, endeavor to go for one with some sort of wireless connection feature.
8. Multi-zone Speaker Function
Most recent AVRs are touted to be able to power different speaker zones.
What this entails is one AV receiver being able to stream multiple audio sources. I.e. the speaker in your bedroom can play different music from the one in your living room with both of them being powered by the same AVR.
Although this is an impressive technological milestone, it is not a necessity as it will mean running extra cables from your living room down to the bedroom and getting an AVR with 7.1 sound capacities, which of course is a pricey choice.
If you need different rooms in your apartment to have different sounds, then it would serve you better to get a portable Bluetooth speaker.
9. How Much Does An AVR Cost
Acquiring an AVR shouldn’t cost so much, you can get an AVR that performs fairly well at around $300.
However, if you need something with top-notch performance and you are willing to spend big bucks, then you should find one at the four-figure price range.
What Is The Best AV Receiver Brand?
Furthermore, with this newly acquired knowledge on how to choose an AV receiver, it is certain that you have a burning desire to get one for yourself right?
Well even if you do not wish to purchase one right away, it is still imperative that you are conversant with the best brands.
You may have questions in your mind like; which brand AV receiver is the best? It would be criminal of me to single out one AV receiver brand as the best because the AVR production industry is overwhelmed with several brands that manufacture outstanding AVRs with impressive features.
In this case, I would be talking about my top two AV receiver brands you can and should choose from; they are the Denon brand and the Yamaha brand.
1. The Denon AVR-S750H:
This AVR comes with everything you could ever need in an AV receiver; it has several inputs (alongside six HDMI), Dolby Atmos and DTS:X 7.1 support channels (for immersive and heightened sound performance) and an all-encompassing wireless stream feature like; Airplay2, Spotify, Apple Music, and Bluetooth.
This AVR is easy to assemble and utilize due to its little touches like; auto naming of HDMI sources, and basic, clear on-screen menus.
All these features would allow you to get the best out of the Devon AVR-S750H in terms of performance.
2. The Denon AVR-X3600H
The Denon X3600H would be a great option for you if you are a movie buff and don’t mind spending a little bit more to acquire a high-quality AVR. This AVR would give you a live cinematic sound experience.
The Denon and the aforementioned Denon S750H both support the same audio format.
The Denon X3600H is equipped with two more amp channels as opposed to the aforementioned.
The additional amps augment the surround sound of the Denon and can power a separate pair of speakers in different audio zones; it has an augmented user interface with more defined graphics, more HDMI inputs, the multi-room capacity to send AV signals around our house, and more HDMI inputs.
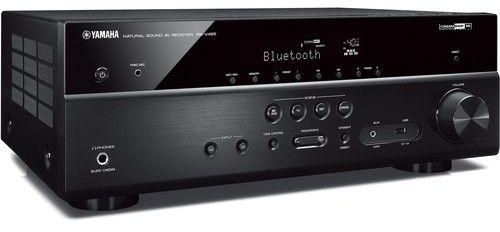
3. The Yamaha RX-V685
The Yamaha RX-V685 would be a nice option for you if you wouldn’t like to run cables all over your room as this AVR outputs surround sound if you have Yamaha Music Cast Speakers.
The Yamaha RX-V685 has solid room calibration and supports both DTS:X and Dolby Atmos soundtracks. Its five HDMI inputs are sufficient for several systems.
This brand supports wireless surround speakers due to its 5.1 channel. However, it has fewer amp channels and HDMI ports and its room correction performs mildly.
Regardless, if you want all of the features presented by this AVR on a budget, then the Yamaha RX-V685 is your best bet.
How To Setup AV Receiver
Furthermore, we are going to take a look at how to set up an Av receiver. You should pay undivided attention to this particular section especially if you are an AV rookie as it is the most technical part of this text. Let’s get into it.
1. Plugging In Your Cables
When you eventually purchase your desired AVR and place it in your preferred position, then you have to plug in your cables.
The number of connections behind any amp can be overwhelming, but you should take extra care to properly set it up in one instance in order to avoid a repeated process.
First off, before you do anything, I advise you to turn off the AVR when plugging your speakers, sources, and subwoofers in.
This should be done in order to prevent the shorting of circuits, pops, or any threat to your system in the case of a wrong connection.
Several AVRs have everything labeled to make for an easy setup process.
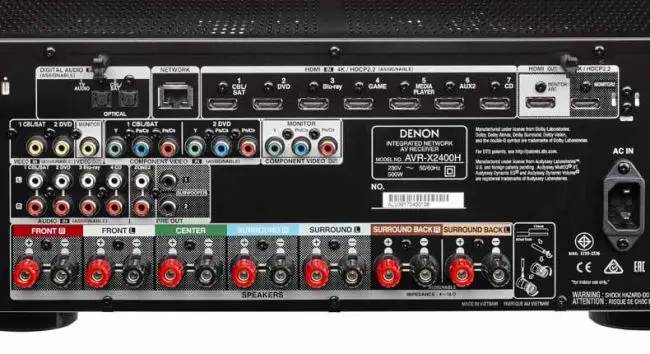
It is worthy of note to look out for the “HDCP2.2” label above the HDMI ports in the case that you are going to play 4k content.
In many scenarios, just a few HDMI ports will be HDCP2.2 certified. Endeavor your 4k Blu-ray player is plugged into these.
If you take a closer look you would notice that every HDMI port has a source assigned to it; DVD, Game, Blu-ray, media player, and many more.
Those were not placed there by accident; the producer of the AVR has meticulously placed them in those specific places.
2. Room Calibration
Several AV receivers are equipped with a set-up mic. Plugin the mic and proceed with the auto-calibration when it prompts.
This feature will measure your room and speakers, automatically set your speakers’ levels, distances and even optimize the performance of the amp to fit into its surroundings.

Your sound system would not sound proper until the calibration is complete. As soon as you plug in your mic, just religiously adhere to the instructions displayed on the screen.
The calibration of AVRs varies from one another. Some can take just under a minute, lasting for only a few seconds, while others due to several measurements may take up to ten minutes. You can go make a sandwich while it calibrates.
I would advise that this calibration is carried out immediately after you have successfully plugged in everything to get it over and done with.
I mean the quicker you can get to enjoy your home entertainment system, the better right?
3. DSPs And Surround Sound Modes
As you get excited by the completion of the AVR’s calibration process, you should watch out for the DSPs and surround mode options.
Surround modes can be great fun to experiment with. The Yamaha AVR brands are equipped with several great sound programs for conjuring specific surroundings and delivering a mild yet reassuring effect.
Digital Sound Processing (DSP) has certain dissimilarities with DTS or Dolby when it comes to Adventure/Action/Drama/Sci-Fi/Games modes that augment specific areas of the sound.
I would place my focus on a few noteworthy sound modes that put sound quality first. Take note of the ‘pure direct’, ‘direct’, or ‘straight’ modes on your amp as they usually provide the purest source to the output signal.
However, they are different from brand to brand, but they all turn off any irrelevant circuitry part, which in turn delineates any distortion and eliminates any interferences with the sole aim of maintaining a pure signal path.
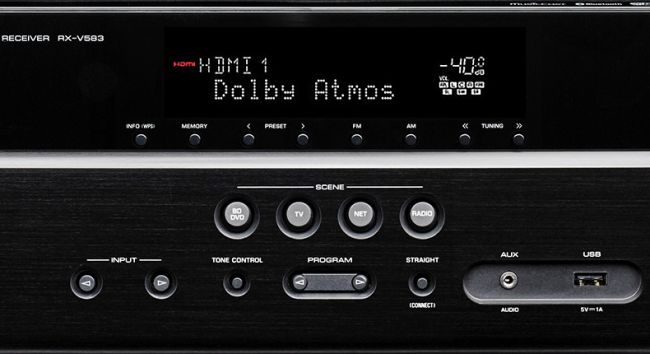
You Are All Set-Up: When we put our AVRs to the test, we observe it for at least a two-day period to experience the full extent of its quality, but in your case, it’s already yours.
You bought it, so you can go ahead, grab a bite, a cold glass of juice, put in some great music or movie (whatever rocks your boat) and have a blast.
How To Connect AV Receiver To TV
If you specifically need to know how to connect the AV receiver to the TV, then this section is great for you.
In this section, I would take you through the process of connecting your AVR to television in a more detailed fashion than I did above.
This is a four-step process, so you need to pay attention and follow each step religiously.
- Before you do anything, first observe the rear of your AV receiver. This would allow you to see the types of inputs your AVR is equipped with as well as your television.
You may find inputs like; Composite cables, component cables, S-Video, and HDMI. Take note of all your options as this would guide you in buying the proper cables. - Secondly, you have to pick the connection method that you like. I recommend that you purchase cables with the highest of quality in order to ensure you get the best video and audio experience.
The HDMI gives you the best video and audio, then the S-Video, then component, and finally composite cables. - Still with me? Good. Next thing you have to do is plug one side of the cable to the stipulated output on the television and the other side should be plugged into the right input on your AVR.
After this is done, a signal is then transferred from the TV through your AVR which gives you the power to control it alongside other components of your home theater via the same remote and device.
If you eventually go with an HDMI, then you would have just a single cable that needs plugging in because the video and audio data transfers via the same cable.
However, more cables would be needed by S-Video, composite, and component in to get plugged into the appropriate inputs. This would enable the correct reception of video and audio information. - Finally, you need to pick the right input in front of the receiver. When your television is plugged into your receiver’s rear, you plug it into one of a plethora of like inputs.
They are built in that manner to allow you to plug various devices into one receiver. Picking the right input gives you the opportunity to utilize that said device. Press the “input” button, this would power the input you have plugged your Television. That’s about it, turn on your tv and enjoy it.
Conclusion
AV receivers are essential to your Home theater system; it is the epicenter of your home theater system and enhances every aspect of its performance.
Like I said at the beginning of this article; when you get to the end, you should be able to lecture a class on AV receivers.
Any areas you do not grasp at first, a second look would certainly put you right.


